
Did you know a worm can eat its own weight in food every day?
Worm farming is a great way to reduce your household food waste. As long as you have an area in your garden that is well sheltered like a balcony, verandah, pergola etc, it’s easy to do and the benefits are well worth it. Some even like to have their worm farms indoors like a laundry or garage.
The following guide will show you just how easy it is to be a worm farmer.
How to get started?
1. Finding a Location
Worms are seasonal creatures. In summer, keep your worms in a cool, sheltered environment, away from direct sunlight. In the colder months, move them into a warmer area to keep them productive as temperatures drop. Where possible, place close to your kitchen so it’s easier to maintain and add food scraps.
2. Setting up a Worm Farm
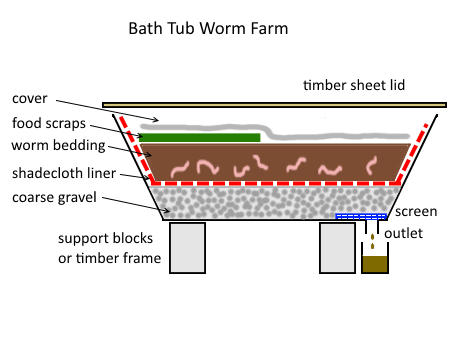
By following these basic designs you can easily build your own worm farm by using anything as simple as an old storage container.
The easiest way to get started is to buy one of our basic worm farms designed for beginners or a commercially made worm farm. These usually have 2-3 levels. If you want something larger we can assist you with several of our different DIY designs and construction methods.
3. What you will need
- A worm farm of your choosing
- Compost worms – minimum 1000 (or 1000 x no. of people in your household)
- Worm farm bedding – shredded cardboard 50%, Coco peat 50% and a news paper
- Start up worm farm food and or food scraps (process in a food processor for best results)
- A beginners guide to worm farming
Start your worm farm by lining the base with damp newspaper or cardboard that’s cut or folded to fit the base. If you have purchased one of our beginner worm farms then simply line the base of the first/bottom level with the paper supplied in your kit.


FIRST-BOTTOM LEVEL
Combine and mix the worm farm bedding material in a large bucket or tub and add approx 3-4 litres of warm water and mix in thoroughly. Let soak for a good hour or so. Wring out excess moisture by using your hands, an old kitchen strainer or colander and add to worm farm. The best way to check if the bedding material is of the correct moisture level is by squeezing a large handful of bedding in your fist, if only a few drops of water drip out the bottom then the moister level is perfect. If no water drips out then you will need to keep adding water a little at a time until you achieve the above result.
MIDDLE LEVEL/S – To be used at a later date.
Add your worms and leave uncovered for 20 minutes to encourage worms to migrate down into the bedding. Cover with approx 4 sheets of damp newspaper and or worm blanket then farm lid and you’re ready to go. Over time your worms will eventually eat the newspaper as well so simply replace with new damp newspaper when required.
Depending on your choice of worm farm purchase or DIY design, once the 1st tray is full to the brim of nearly pure castings, you can then add the next tray and so on. Start by placing food in a new tray, cover with damp newspaper and or worm blanket and your worms will gradually move upwards to live and feed. For single level designs it’s time to harvest.
SUMP-BASE LEVEL – The Toilet
This is where the worm wee (leachate) gathers.
The following information is quite important and very misunderstood so please read carefully.
Leachate vs. Worm Tea: Keeping the distinction between these terms is actually quite important. Refer to our definitions for more information.
REMEMBER:
Worm farms process less food than a compost bin, so make sure you’re not overfeeding your worms. Uneaten food will begin to smell and attract unwanted pests. Only feed again when the previous lot of feed has nearly gone.
Each day a worm will consume approximately its own body weight in food. This means you can feed your worm farm a few handfuls every few days. Once it’s established and the worms are breeding, you can try feeding them more.
Cutting food into small pieces and or processing in a food processor makes it easier and quicker for the worms to consume.
Here are some interesting worm facts:
Worldwide, approximately 6,000 species of earthworms are described in 20 families, eight of which are represented in Australia. Australian natives are estimated to total 1,000 species belonging to three of these families.
Invertebrates make up 97% of species on earth without backbones and worms are just one of them.
Worms are most definitely a gardener’s friend and are vital to soil health. As they burrow beneath the ground, they consume soil, feeding on decomposing organic matter such as roots and leaves, sand grains and microorganisms. As the organic matter passes through their digestive systems, vital minerals and nutrients are transported and it’s been shown that not only is worm digested soil healthier, it also has more phosphorous.
Worms are a sign of healthy soil. If there’s no food they’ll go elsewhere. The more worms in your soil, the more nutritious it is, not only for them but for your plants! If you don’t see any signs of worms, simply add more organic matter and they will find it.
The burrows that worms create act as ducts that water and oxygen can pass through, helping to keep soil moist and aerated, vital for good plant growth allowing roots to grow and develop.

Worms are hermaphroditic (they have both male and female reproductive organs) but they need to mate with other worms to produce offspring. After they’ve mated, worms form tiny, grain sized cocoons that are buried. They can produce up to two cocoons a week, each containing 1-7 hatchlings. After a two to four-week gestation period, the baby worms emerge.
Lots of animals like birds and chooks love to eat worms but there’s enough for them in a healthy garden to cater for them all – there could be as many as 1,000,000 worms living in an acre lot of land.
Worms don’t have lungs, they breathe through their skin. If there’s too much rain, worms will rise to the surface to breathe as they may become starved of oxygen in water drenched soil. However, light paralyses worms so if they’re out in it for more than an hour, they can’t retreat back into the safety of darkness and will die.
During darkness worms often feed on the soil surface. If you head outside with a torch you’ll spot them all diving back under cover when they see the light, just like a pool full of synchronised swimmers.
Worms have no eyes, ears or teeth but can have up to five hearts.
Contradictory to popular belief, if you chop a worm in half it won’t grow again and will die… twice.

